Installing Proxmox Virtual Environment (VE)
  1. Proxmox VE/

Installing Proxmox Virtual Environment (VE)

666 words·4 mins
Table of Contents
Proxmox VE - This article is part of a series.
Part 1: This Article

0. Pre-Installation Checklist
#

  • A computer that meets the PVE system hardware requirements (recommended specifications below):
    • A 64-bit CPU with Intel VT/AMD-V support (i.e., virtualization technology).
    • At least 2 GB of RAM is the official minimum, but more is always better — the more memory you have, the more VMs you can run.
    • An SSD is recommended as the boot and OS storage medium.
    • VM storage supports multiple backends, including local storage (ZFS, DIR), shared storage (NFS, CIFS), and distributed storage (CephFS).
    • Multiple NICs are recommended; 10 Gbit NICs are also supported.
    • For PCIe device passthrough, the CPU must also support VT-d/AMD-d.
  • An Ethernet cable: a Cat 6a Ethernet cable is recommended.
  • A USB drive for installing and booting the system: at least 8 GB capacity.
  • USB formatting & flashing tools:

1. Download the Official PVE ISO Image
#

  1. Download the Proxmox VE ISO from the official Proxmox downloads page. Select the latest Proxmox VE version (8.0-2 in this example) and click Download.
  2. Verify the integrity of the ISO image. Run the following command to check the PVE ISO image (for security purposes, always verify the image after downloading):
     sha256sum proxmox-ve_8.0-2.iso
     # Output
     e2b27648a8a91c0da1e8e718882a5ff87a8f054c4dd7e0ea1d8af85125d82812  proxmox-ve_8.0-2.iso

If the output matches the SHA256SUM listed on the official website, the file is authentic and safe to use. If it does not match, proceed with caution — the file may have been tampered with.

This applies not only to the PVE ISO image but to any ISO image — Debian, OpenMediaVault, and others. Always verify integrity, especially for files downloaded from third-party sources.

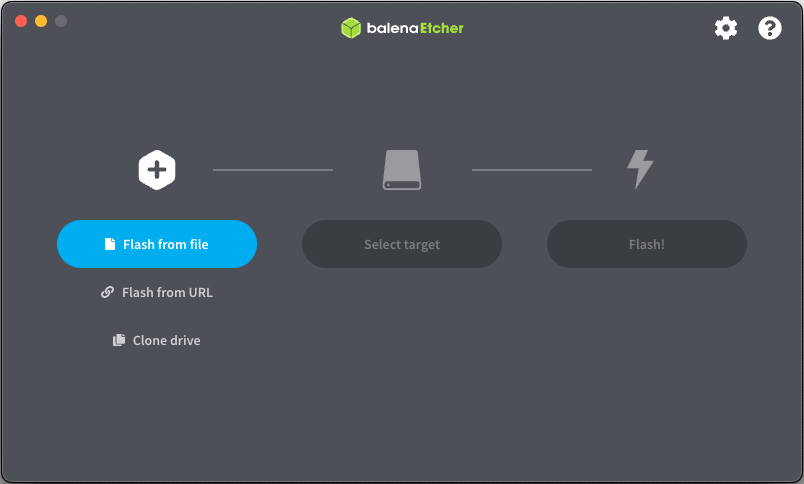
2. Create a Bootable USB Drive (Using balenaEtcher)
#

  1. Insert the USB drive and launch balenaEtcher.
    image
  2. Select the downloaded PVE ISO image proxmox-ve_8.0-2.iso.
  3. Select the target USB drive (a 32 GB Kingston drive is used here).
  4. Once everything is configured, click Flash to start creating the bootable USB drive.
  5. Wait for the flashing process to complete…
  6. When you see the following screen, the bootable USB drive has been created successfully. You are now ready to proceed with the system installation.

3. Begin Installation
#

Installing Proxmox VE on a single node is relatively straightforward — in most cases you can accept the defaults and click Next. However, pay close attention to the network configuration step. Here is the full installation walkthrough:

  1. Insert the USB drive into the computer, power on, and enter the BIOS settings. Set the USB drive as the first boot device.
  2. On the PVE installation screen, select Install Proxmox VE (Graphical) to begin.
  3. Select I agree to proceed.
  4. Select the target disk for installation.
    For more advanced storage configuration, click Options on the right and choose the filesystem that best fits your needs. Here we select the ext4 filesystem.
    Option descriptions:
    • hdsize: Total hard disk size to use for the Proxmox installation.
    • swapsize: Size of the swap partition.
    • maxroot: Maximum disk space allocated to the /root partition.
    • minfree: Minimum free space reserved after installation.
    • maxvz: Maximum disk space allocated to the data partition (typically the /var/lib/vz directory). For ZFS filesystem options, refer to:
    • Advanced ZFS Configuration Optionshttps: pve.proxmox.com/pve-docs/pve-admin-guide.html#advanced_zfs_options
    • ZFS on Linux: https://pve.proxmox.com/pve-docs/pve-admin-guide.html#chapter_zfs
    • ZFS: https://en.wikipedia.org/wiki/ZFS
  5. Configure your country/region and keyboard layout.
  6. Set the administrator password and email address.
  7. Network configuration:
    • Management Interface: If you have multiple NICs, make sure the IP address corresponds to the correct interface.
    • Hostname: Choose any hostname you prefer.
    • IP Address and Subnet Mask: This is the PVE host IP address and will also serve as the URL for the PVE web management interface.
    • Default Gateway: The default value is usually fine — the installer will automatically detect your router’s gateway address.
    • DNS Server: The default value is usually fine.
  8. Review the configuration summary and click Install.
  9. Wait for the installation to complete…
  10. Installation complete — click Reboot.
  11. On the GRUB boot menu, select the first option Proxmox VE GNU/Linux to boot into the system.!
  12. If you see the following screen, the system has booted successfully.

References
#

Proxmox VE - This article is part of a series.
Part 1: This Article